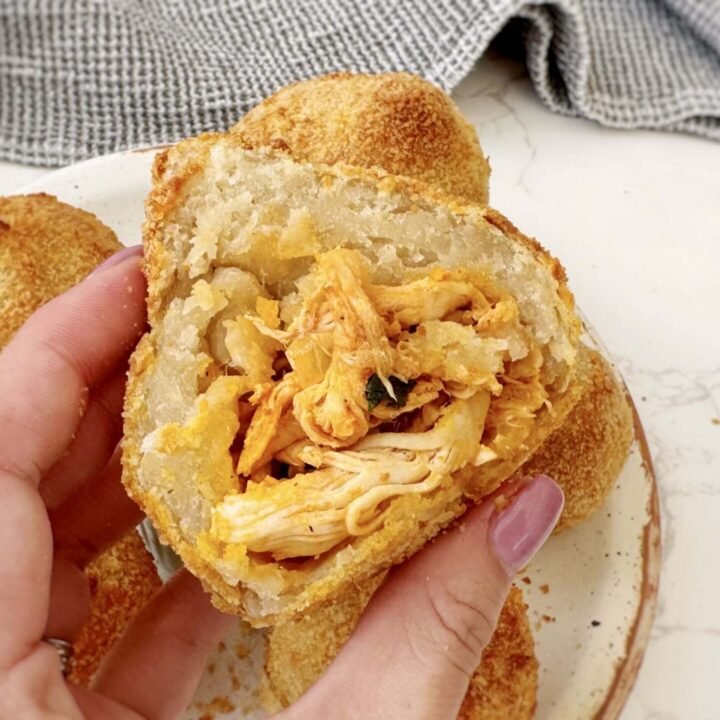
These Healthier Coxinhas or Brazilian Chicken Croquettes are a lighter twist on one of Brazil’s most beloved street foods. Traditionally deep-fried and indulgent, these Healthier Coxinhas are air-fried or baked to achieve the same crispy, golden exterior without excess oil. Inside, they’re filled with a savory mixture of shredded chicken, cream cheese, onion, garlic, and fresh herbs, all wrapped in a soft dough made from chicken broth and flour. The result is a perfect balance of crisp, creamy, and comforting flavors in every bite.
Nutritionally, these Healthier Coxinhas are packed with lean protein from the chicken breast, healthy fats from olive oil, and vitamins from onion, garlic, and herbs. Air frying instead of deep frying reduces the overall fat content while still providing the crunchy coating that makes coxinhas so irresistible. This makes Healthier Coxinhas an excellent choice for anyone who wants to enjoy a traditional Brazilian treat without compromising their balanced lifestyle.
These Healthier Coxinhas are incredibly versatile. They make a perfect appetizer for parties, a snack for game day, or a unique addition to a family dinner spread. They’re also a fantastic dish to prepare for celebrations like New Year’s Eve, birthdays, or Brazilian-themed gatherings. With their teardrop shape and golden color, Healthier Coxinhas look impressive on a platter and taste just as good as their deep-fried counterparts. Whether served as a snack, appetizer, or main dish with a side salad, these croquettes deliver all the flavor of traditional coxinhas in a healthier way.
Why You Will Love These Healthier Coxinhas
There are so many reasons to fall in love with Healthier Coxinhas. First, they offer all the flavor and texture of authentic coxinhas while being lighter and less greasy. Air frying gives them a crunchy, golden crust that rivals deep frying, without the heavy oiliness. The filling, made with shredded chicken, cream cheese, and aromatic herbs, provides a creamy, savory center that contrasts perfectly with the crispy coating.
You’ll also love how versatile these Healthier Coxinhas are. They can be served as appetizers for gatherings, snacks for kids, or even a fun dinner when paired with a side of rice and salad. They’re perfect for events like game day, birthdays, or family get-togethers, where finger foods are always a hit. Plus, they’re customizable, you can add vegetables, swap cheeses, or adjust the seasonings to make them your own.
Another reason to love these Healthier Coxinhas is how portable they are. Once cooked, they’re easy to pack for lunches, picnics, or road trips. Their teardrop shape makes them fun to eat, especially for kids. Best of all, you don’t need to feel guilty about enjoying them, since this healthier version cuts back on calories and fat while keeping all the deliciousness intact. Whether you’re introducing friends to Brazilian cuisine or recreating a childhood favorite with a modern twist, these Healthier Coxinhas will quickly become a go-to recipe in your kitchen.

Equipment You Will Need
-
Medium saucepan – For cooking chicken and preparing the dough.
-
Skillet – To sauté onion, garlic, and chicken filling.
-
Mixing bowls – For holding shredded chicken, beaten egg, and breadcrumbs.
-
Knife and cutting board – To chop onion, garlic, and herbs.
-
Measuring cups and spoons – To ensure accurate ingredient portions.
-
Wooden spoon or spatula – For stirring dough until it forms.
-
Tongs or fork – To handle hot chicken or turn coxinhas during cooking.
-
Rolling surface – To flatten and shape the dough portions.
-
Air fryer – For cooking the Healthier Coxinhas until crispy.
-
Cooking spray brush – To lightly coat croquettes before air frying.
-
Timer – To ensure coxinhas are cooked evenly without overbrowning.
-
Cooling rack – To keep them crisp after air frying.
Ingredients
Filling
-
1 medium chicken breast (200–250 g / 7–9 oz) – Lean protein base of the filling.
-
½ small onion, finely chopped (40 g / 1.5 oz) – Adds sweetness and flavor.
-
1 garlic clove, minced – Provides aromatic depth.
-
1 tsp olive oil (5 ml) – For sautéing vegetables.
-
1 bay leaf (optional) – Enhances broth flavor while cooking chicken.
-
1 tbsp tomato paste (15 g / 0.5 oz, optional) – Adds richness and color.
-
2 tbsp cream cheese (30 g / 1 oz, Catupiry or similar) – Makes filling creamy and authentic.
-
1 tbsp parsley or green onion, chopped (5 g) – Adds freshness.
-
Salt and black pepper to taste – Balances flavors.
Dough
-
1 ½ cups chicken broth (375 ml) – Reserved from cooking chicken.
-
1 ½ cups all-purpose flour (190 g / 6.7 oz) – Forms the dough structure.
-
1 tbsp butter (14 g / 0.5 oz) – Adds richness and elasticity.
-
Pinch of salt – Enhances dough flavor.
Breading
-
1 egg, beaten – Helps breadcrumbs stick.
-
1 ¼ cups breadcrumbs (125 g / 4.5 oz, panko preferred) – Creates crispy coating.
-
Cooking spray or a little oil for brushing – Ensures even browning in air fryer.
Method
Step 1: Cook and Shred Chicken
Simmer the chicken breast with bay leaf and a pinch of salt for about 20 minutes. Reserve 1 ½ cups of the broth and shred the chicken finely.
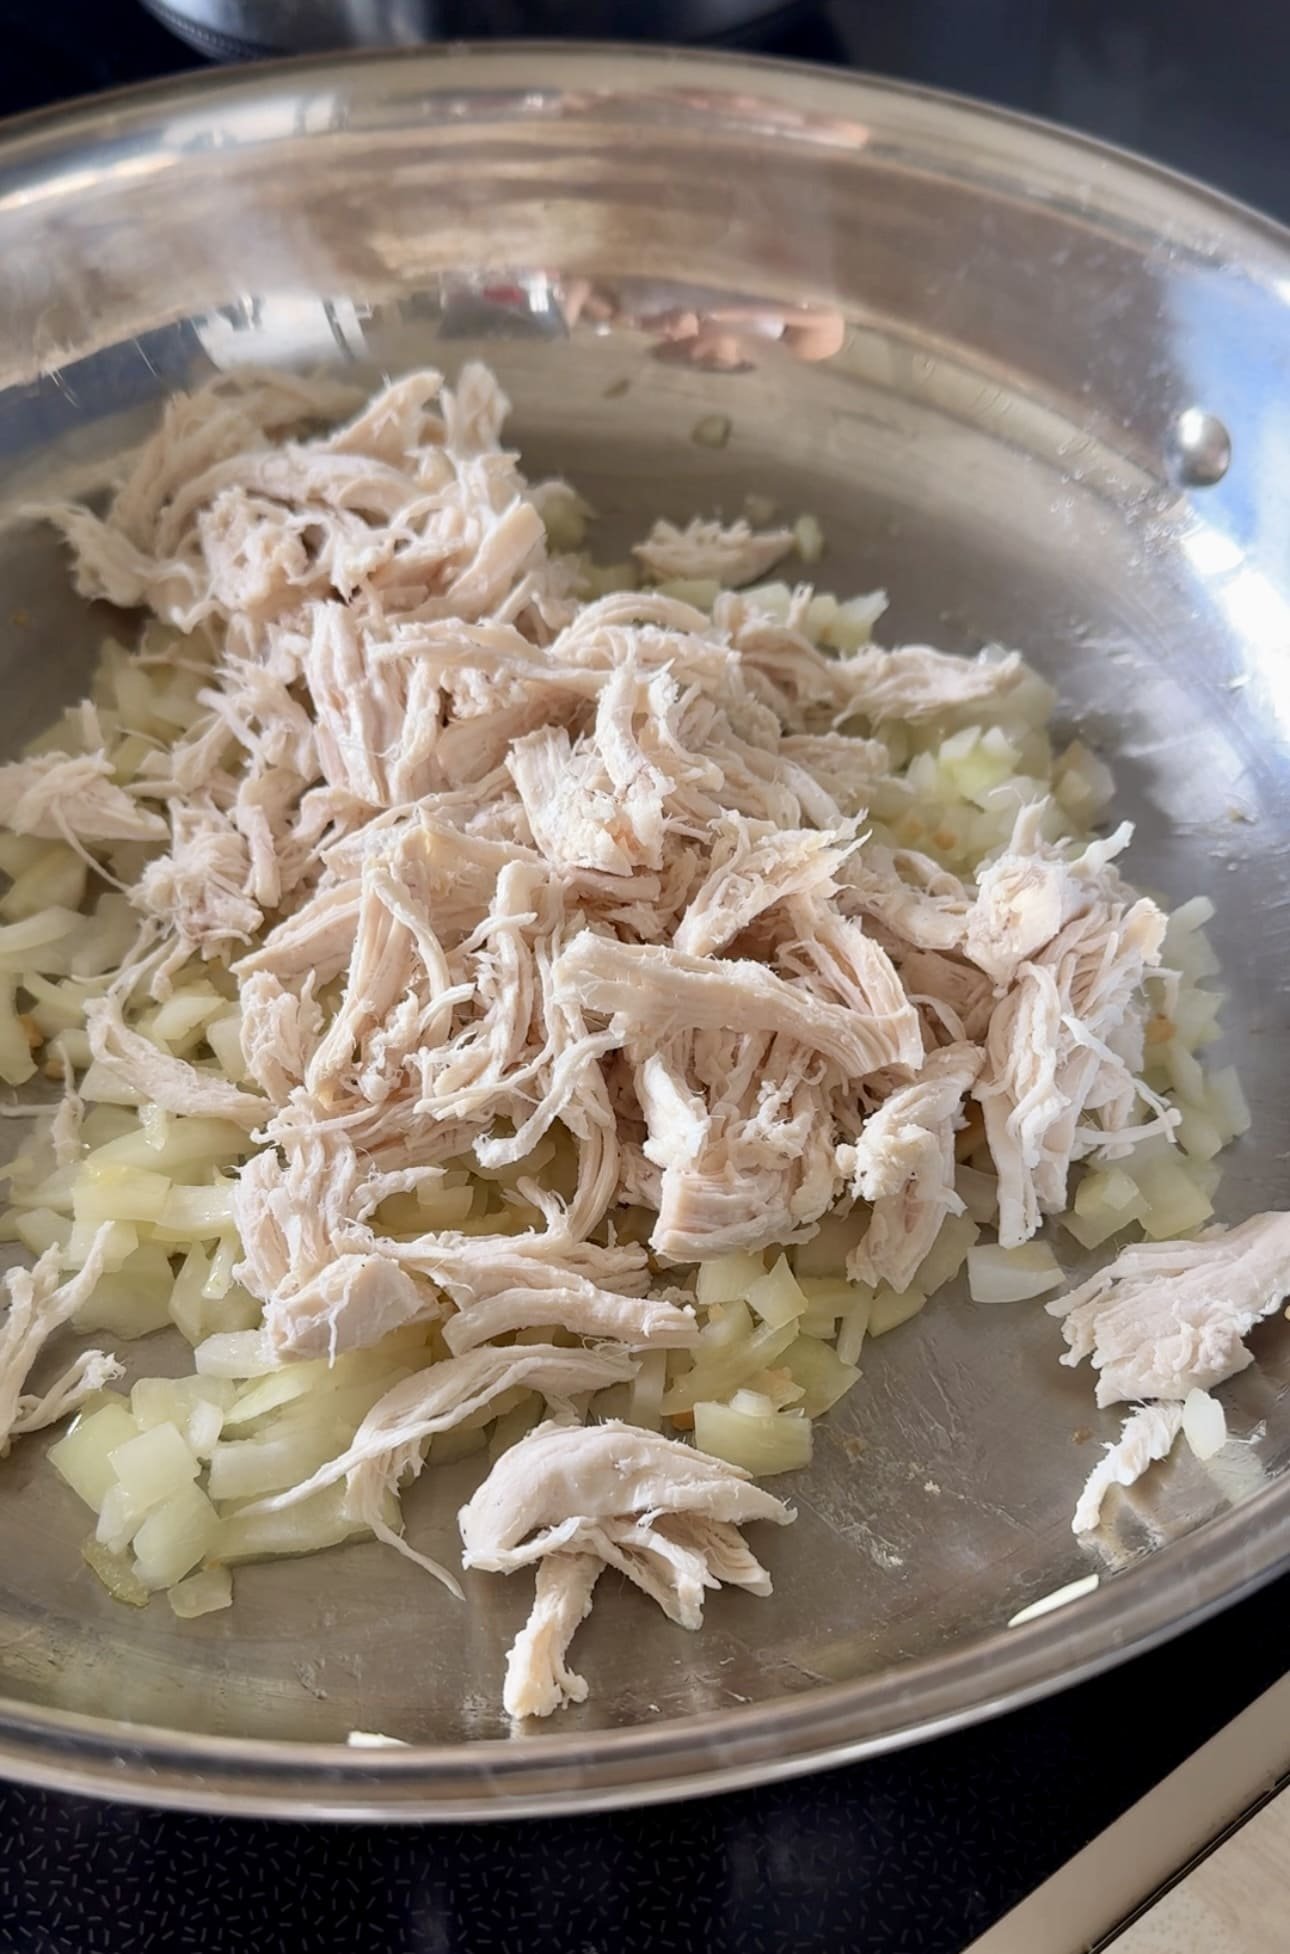
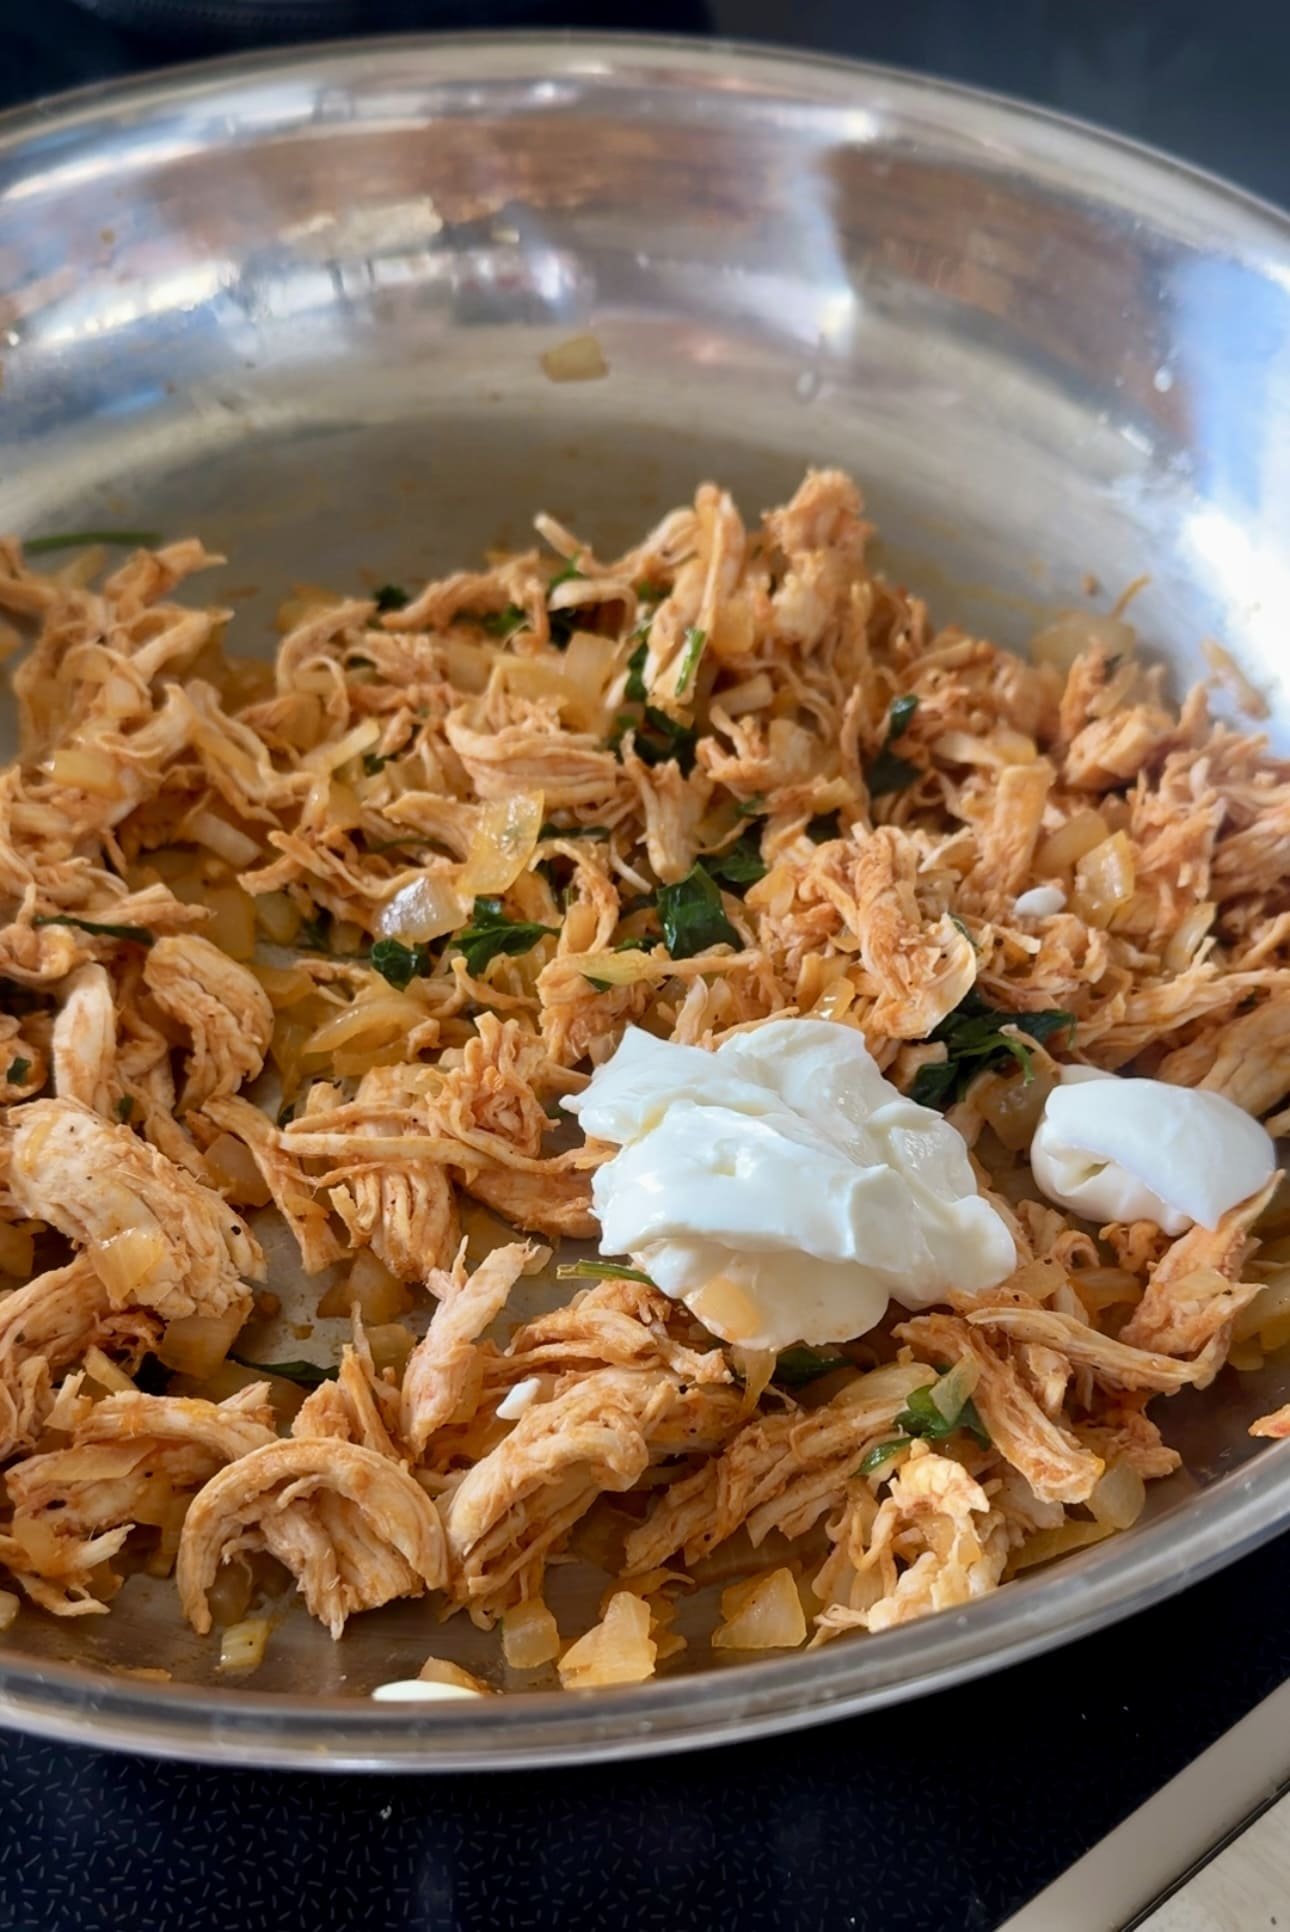
Step 2: Make the Filling
Sauté onion and garlic in olive oil until fragrant. Add shredded chicken, tomato paste (if using), salt, and pepper. Stir in cream cheese and parsley, then set aside to cool.
Step 3: Make the Dough
In a saucepan, bring reserved chicken broth, butter, and salt to a boil. Add flour all at once, stirring until dough pulls away from the sides of the pan. Allow to cool until warm to the touch.
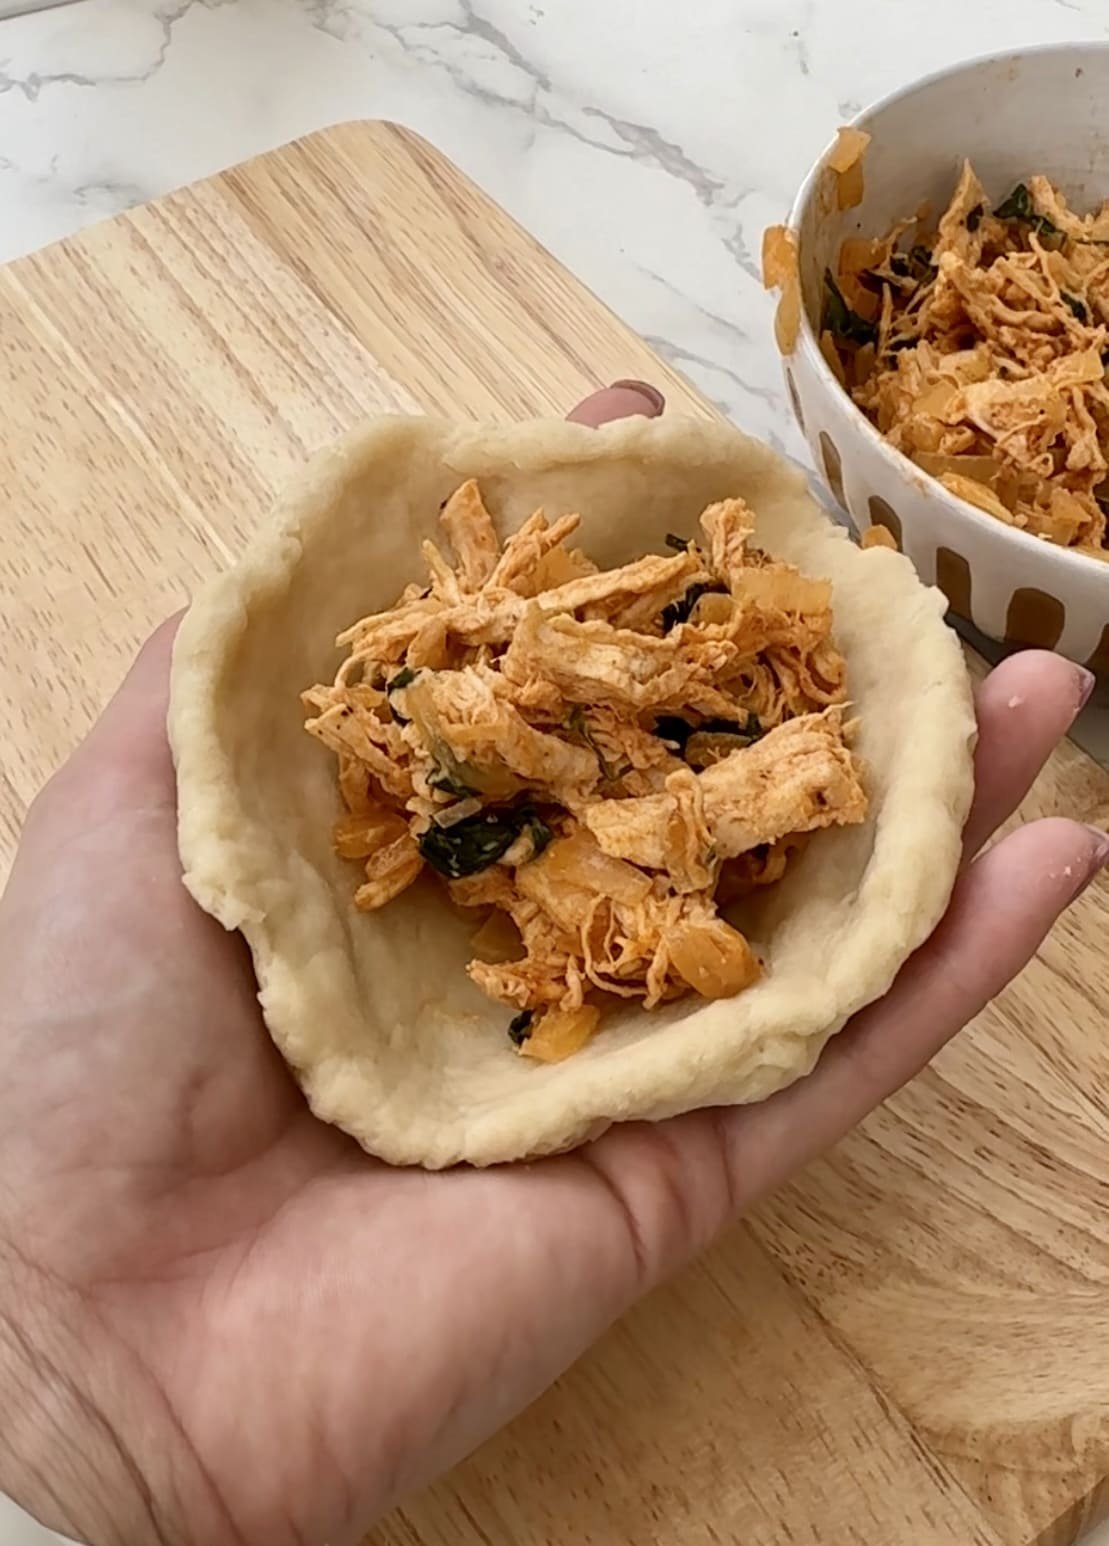
Step 4: Shape the Coxinhas
Divide dough into 8 pieces. Flatten each piece, place filling in the center, close tightly, and shape into a teardrop.
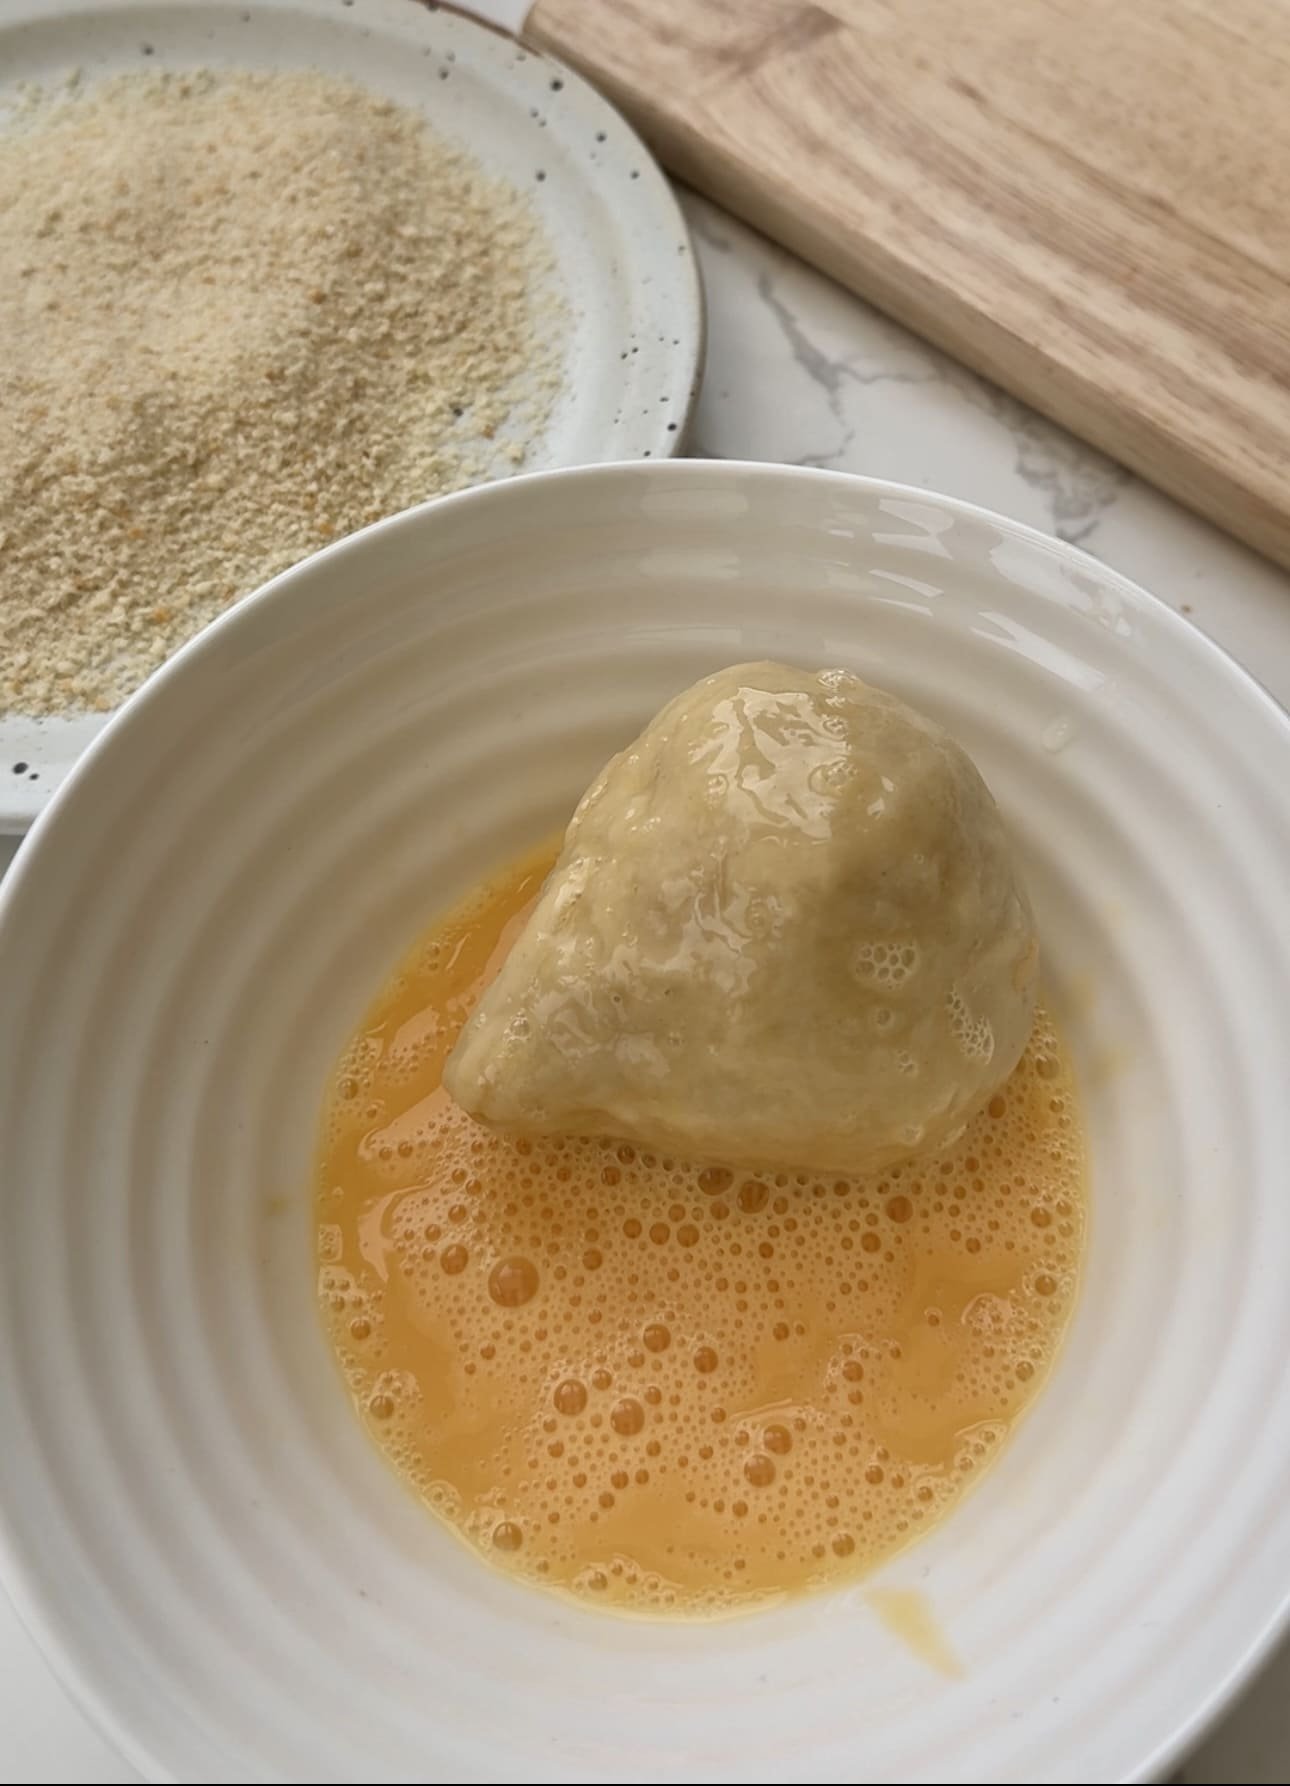
Step 5: Bread the Coxinhas
Dip each shaped coxinha into beaten egg, then coat with breadcrumbs. Lightly spray or brush with oil for even browning.

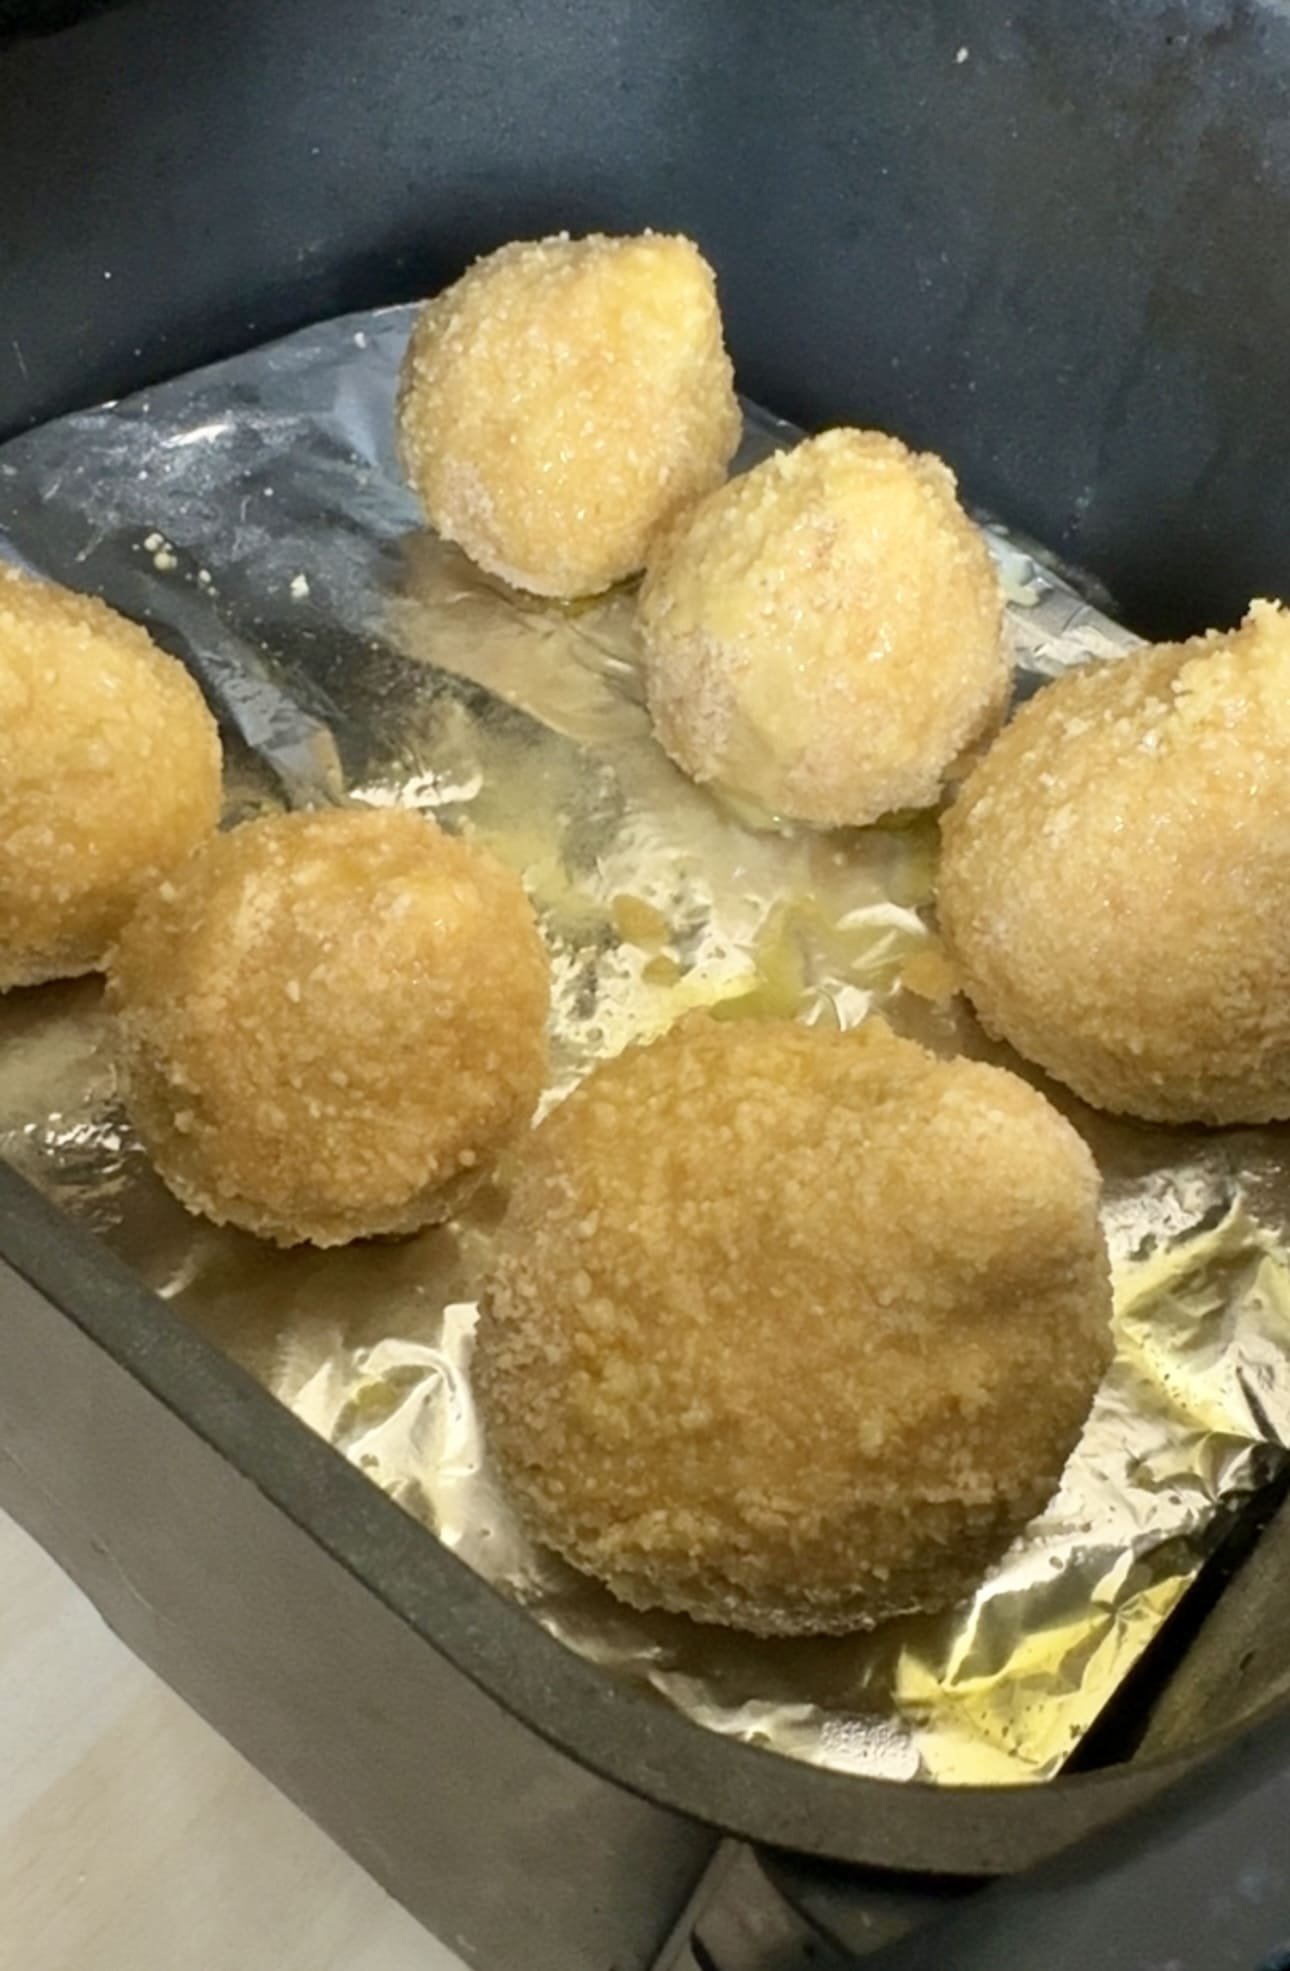
Step 6: Air Fry
Preheat air fryer to 375°F (190°C). Arrange coxinhas in the basket without overcrowding. Air fry for 12–15 minutes, turning halfway, until golden brown.
Nutrition
(per coxinha, estimate)
-
Calories: 180 kcal
-
Protein: 12 g
-
Fat: 6 g
-
Carbohydrates: 20 g
-
Sugars: 1 g
-
Fiber: 1 g
Note: Nutritional values are estimates and may vary depending on the specific brands and ingredients used.
Tips for Making these Healthier Coxinhas
-
Shred chicken finely for a smoother filling.
-
Cool filling completely before shaping to prevent dough from tearing.
-
Don’t skip preheating the air fryer for even crisping.
-
Use panko breadcrumbs for maximum crunch.
-
Seal edges well to avoid filling leakage during cooking.
-
Brush or spray lightly with oil for golden results.
-
Adjust seasoning in both filling and dough to your taste.
-
Serve immediately for best flavor and texture.
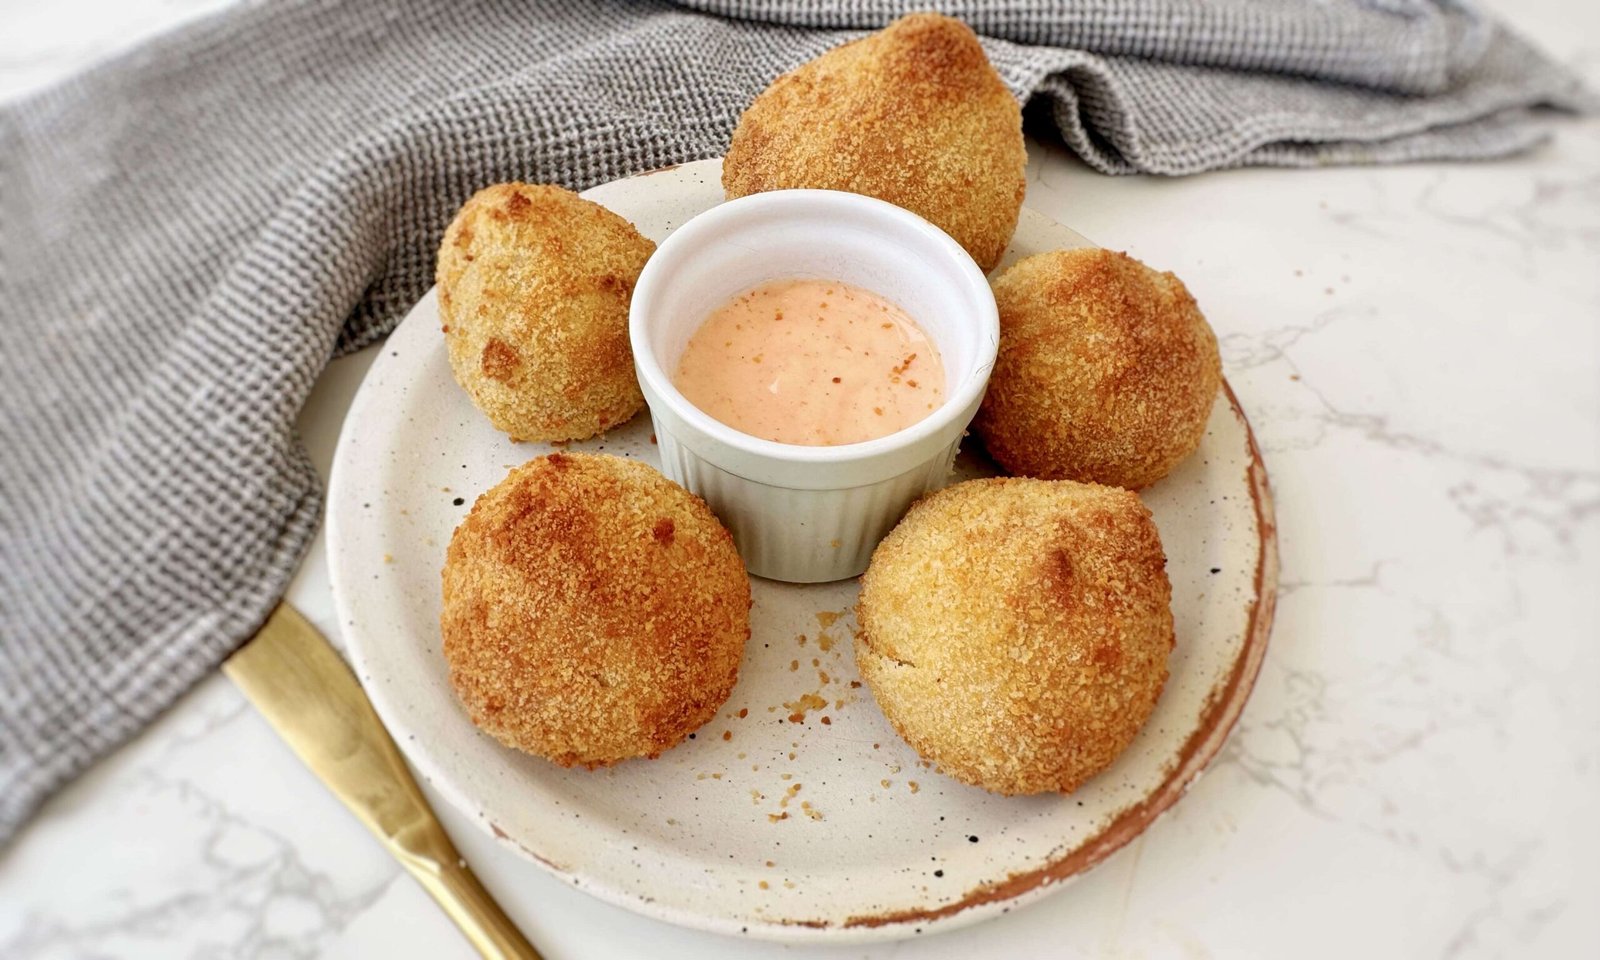
How to Best Serve these Healthier Coxinhas
-
As an appetizer for parties or game nights.
-
With a fresh green salad for a balanced meal.
-
As part of a Brazilian-themed dinner alongside rice and beans.
-
With dipping sauces like spicy mayo or chimichurri.
-
On a holiday platter for Christmas, New Year’s Eve, or birthdays.
-
In lunch boxes as a protein-rich snack.
-
With cold drinks for a casual get-together.
-
As finger food at barbecues or family gatherings.
Customizing Healthier Coxinhas
-
Add vegetables like corn, peas, or carrots to the filling.
-
Use different cheeses such as mozzarella or cheddar.
-
Swap chicken for turkey or tuna for variation.
-
Make it spicy with chili flakes or hot sauce in the filling.
-
Try whole wheat flour for added fiber in the dough.
-
Make mini coxinhas for bite-sized appetizers.
-
Use gluten-free flour and breadcrumbs to suit dietary needs.
-
Bake instead of air frying if you don’t own an air fryer.
How to Store Healthier Coxinhas
Store cooked coxinhas in an airtight container in the refrigerator for up to 3 days. Reheat in the air fryer or oven at 350°F (175°C) for 5–7 minutes to restore crispiness. To freeze, arrange uncooked coxinhas on a tray until solid, then transfer to a freezer bag for up to 1 month. Cook directly from frozen, adding 3–4 extra minutes to the air fryer time.
Final Thoughts
These Healthier Coxinhas are a lighter, modern twist on a classic Brazilian street food favorite. By air frying instead of deep frying, you reduce excess fat while keeping the signature crispy outside and creamy, savory inside. These coxinhas are versatile enough for family dinners, holiday parties, or casual snacks, and their teardrop shape makes them both fun and elegant to serve. With their balance of protein, flavor, and texture, Healthier Coxinhas are proof that you don’t need to sacrifice taste for a healthier lifestyle. Whether enjoyed fresh out of the air fryer or reheated for a quick snack, Healthier Coxinhas will quickly become a staple recipe in your kitchen.
If you Enjoyed this Recipe Why Not Try These:
- Egg Breakfast Empanadas
- Hot Honey Feta Filo Pastries
- Ham and Cheese Stuffed Ciabatta
- Crispy Pizza Buns
- Tuna Croquettes
Healthier Coxinhas
These Healthier Coxinhas: Brazilian Chicken Croquettes are a lighter twist on one of Brazil’s most beloved street foods. Traditionally deep-fried and indulgent, these Healthier Coxinhas are air-fried or baked to achieve the same crispy, golden exterior without excess oil. Inside, they’re filled with a savory mixture of shredded chicken, cream cheese, onion, garlic, and fresh herbs, all wrapped in a soft dough made from chicken broth and flour. The result is a perfect balance of crisp, creamy, and comforting flavors in every bite.
Ingredients
Filling
- 1 medium chicken breast (200–250 g / 7–9 oz) – Lean protein base of the filling.
- ½ small onion, finely chopped (40 g / 1.5 oz) – Adds sweetness and flavor.
- 1 garlic clove, minced – Provides aromatic depth.
- 1 tsp olive oil (5 ml) – For sautéing vegetables.
- 1 bay leaf (optional) – Enhances broth flavor while cooking chicken.
- 1 tbsp tomato paste (15 g / 0.5 oz, optional) – Adds richness and color.
- 2 tbsp cream cheese (30 g / 1 oz, Catupiry or similar) – Makes filling creamy and authentic.
- 1 tbsp parsley or green onion, chopped (5 g) – Adds freshness.
- Salt and black pepper to taste – Balances flavors.
Dough
- 1 ½ cups chicken broth (375 ml) – Reserved from cooking chicken.
- 1 ½ cups all-purpose flour (190 g / 6.7 oz) – Forms the dough structure.
- 1 tbsp butter (14 g / 0.5 oz) – Adds richness and elasticity.
- Pinch of salt – Enhances dough flavor.
Coating
- 1 egg, beaten – Helps breadcrumbs stick.
- Cooking spray or a little oil for brushing – Ensures even browning in air fryer.
- 1 ¼ cups breadcrumbs (125 g / 4.5 oz, panko preferred) – Creates crispy coating.
Instructions
- Cook and Shred Chicken: Simmer the chicken breast with bay leaf and a pinch of salt for about 20 minutes. Reserve 1 ½ cups of the broth and shred the chicken finely.
- Make the Filling: Sauté onion and garlic in olive oil until fragrant. Add shredded chicken, tomato paste (if using), salt, and pepper. Stir in cream cheese and parsley, then set aside to cool.
- Make the Dough: In a saucepan, bring reserved chicken broth, butter, and salt to a boil. Add flour all at once, stirring until dough pulls away from the sides of the pan. Allow to cool until warm to the touch.
- Shape the Coxinhas: Divide dough into 8 pieces. Flatten each piece, place filling in the center, close tightly, and shape into a teardrop.
- Bread the Coxinhas: Dip each shaped coxinha into beaten egg, then coat with breadcrumbs. Lightly spray or brush with oil for even browning.
- Air Fry: Preheat air fryer to 375°F (190°C). Arrange coxinhas in the basket without overcrowding. Air fry for 12–15 minutes, turning halfway, until golden brown.
Notes
- Shred chicken finely for a smoother filling.
- Cool filling completely before shaping to prevent dough from tearing.
- Don’t skip preheating the air fryer for even crisping.
- Use panko breadcrumbs for maximum crunch.
- Seal edges well to avoid filling leakage during cooking.
- Brush or spray lightly with oil for golden results.
- Adjust seasoning in both filling and dough to your taste.
- Serve immediately for best flavor and texture.
Nutrition Information:
Yield: 8Amount Per Serving: Calories: 180Total Fat: 6gCarbohydrates: 20gFiber: 1gSugar: 1gProtein: 12g